
TermSheet's Asset Management (AM) functionality allows you to consolidate and analyze financial data from various property management systems (PMS) and accounting software. This guide outlines the process of setting up your Chart of Accounts (COA) and ingesting General Ledger (GL) or Trial Balance data into TermSheet, enabling comprehensive financial reporting and insights.
Understanding TermSheet's Approach to Financial Data
Unlike traditional accounting software that relies on account numbers for display order and explicit "total" accounts, TermSheet streamlines your financial data:
- Normalized Structure: TermSheet automatically organizes your accounts into a logical hierarchy, making account numbers unnecessary for display order. This provides a consistent view across all your properties and third parties.
- Automated Totals: You do not need to create separate "total" accounts for groups like "Total Cash" or "Total Assets." TermSheet automatically calculates and presents these totals based on your defined account hierarchy.
- Flexible Ingestion: TermSheet accommodates various file formats from different PMS (e.g., Yardi, MRI, Sage) through specialized "ingestors" that interpret unique file structures.
💡Things to Consider:
We don't have a separate field for Account Number. Add Account Number in the description field if you'd like to keep it visible for reference. In TermSheet the goal is to normalize the data across properties and third parties to create a strucure that is not software specific.
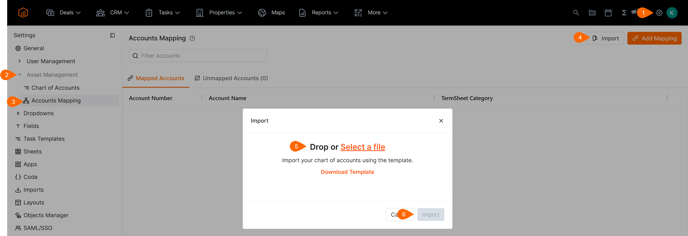
Prepare a Chart of Accounts (COA) Template
- Navigate to Workspace Settings.
- Select Asset Management, then Accounts Mapping.
- Select Import.
- Download the Template from the pop-up window.

- Export your organization's Chart of Accounts data from your PMS system.
- Open the downloaded TermSheet AM Mapping Template.

- Copy/Paste your Chart of Account data into the appropriate columns on the TermSheet AM Mapping template.
- Map your data to the template columns:
-
- Account Name: This is the primary identifier for each account.
- Normal Balance: Indicate whether the account typically has a Debit or Credit balance.
- Report Type: Classify accounts as "Balance Sheet" or "Income Statement."
- Description: (Optional but recommended) If you would like to maintain the original account numbers from your external system, enter them into the description field for reference.
- Account Type: Set all accounts to "Regular" or "Group" initially. TermSheet will automatically handle the visual grouping and totals.
-
- Define Parent Accounts: This is crucial for understanding the relationships between accounts and build the financial report hierarchy. For each account, identify a "Parent Account" in the parent_account column

- Work through the COA, starting from the lowest level accounts and assigning their immediate parent. Accounts that are top-level categories (e.g., "Assets", "Liabilities") will not have a Parent Account in the template.
- Remove Redundant Total Lines: If your external COA includes explicit "Total" lines (e.g., "Total Cash," "Total Assets"), you can omit these from your TermSheet template. TermSheet will automatically generate these totals based on the hierarchy you define.
Import Chart of Accounts
Once your COA template is populated and structured, upload it to TermSheet.
-
Navigate back to Settings > Chart of Accounts.
-
Select Import.
- Select the completed AM template file and select Import.
- Verify the Import. TermSheet uses "Account Name" as the unique identifier for the chart of accounts. If changes are required, perform another import following the same instructions as above. TermSheet will recognize existing accounts and update their attributes (like parent accounts or descriptions).
Ingest General Ledger (GL) Data
Once the Chart of Accounts and initial mapping are set up, the workspace is ready to begin ingesting general ledger data.
There are 3 ways to set up ongoing data updates
- Import GL Data in the Properties Module
- Navigate to a Property
- Navigate to the Financials section.
- Select Import and add the GL data

- SFTP Server Integration
- TermSheet can provide SFTP (Secure File Transfer Protocol) credentials.
- Your property manager or accounting team can securely drop their monthly GL/Trial Balance files into the designated SFTP folder. TermSheet's system will then automatically detect and ingest these files
- Dedicated Email Integration (Most Common):
-
- TermSheet can provide a unique email address (e.g.,
[random_string]@TermSheet.com) for your property. - Configure your property management software or accounting system to automatically send scheduled financial reports (GL/Trial Balance) to this dedicated TermSheet email address.
- TermSheet can provide a unique email address (e.g.,
Contact your account representative or support@termsheet.com to start ingesting GL data via SFTP or email.
Review Settings for Unmapped Accounts
After ingestion, TermSheet will display any accounts from your GL/Trial Balance that were not matched to your established COA.
Navigate to Settings > Accounts Mapping > Unmapped Accounts
